Using React Native's Plugins with Flutter (Android version)

Flutter allows you to build beautiful native apps on iOS and Android from a single codebase. Like most cross-platform mobile application development frameworks, platform specific APIs and device capabilities are exposed to the developer environments using plugins.
React Native, another framework to build mobile apps using JavaScript and React, also has a similar concept, called Native Modules.

Native SDKs for Hybrid Frameworks

React Native has been around for a while and in addition to the numerous packages created by the community, companies also expose their services (think Square, AWS, OneSignal, MapBox, UrbanAirShip) to React Native apps using native modules. However, many services are only available as iOS and Android SDKs; developers building on the newer hybrid frameworks usually are left to create their own adapters.
I ran into this problem a few years ago when I was porting my Cordova app to the still new React Native framework. While all the Cordova plugins in my app were well supported first-party or community modules, none of them had existed for React Native back then. Instead of re-implementing every module, I explored the idea of creating an adapter to use Cordova Modules in a React Native application.
The share of Android and iOS apps are still significantly higher and creating an adapter for every hybrid framework like Cordova, Xamarin, NativeScript, React Native and Flutter may be too much work. Having been a Cordova committer, worked in a team adjacent to Xamarin, studied NativeScript and now contributing to React Native, I believe that the patterns for invoking native modules in all these hybrid frameworks may be similar enough to be able to create a "universal" system. By simply defining a "cross-platform" API and using a system of adapters, SDKs may be able to support all hybrid frameworks well.

React Native to Flutter

The promise of write-once-run-everywhere has historically been perilous, and it may would help to take smaller baby steps. As a start, I tried the approach to use native modules from React Native in my Flutter app; a port that was surprisingly simple.
Plugins can be bootstrapped using Flutter's CLI that generates both the dart file and the corresponding Java code. The onMethodCall function in Java has an if-else condition that is responsible for executing the right method that the application code in dart invokes.
In React Native, methods exposed to JavaScript are annotated with @ReactMethod. When the native modules is "required" in JavaScript, the methods on the module are discovered using reflection. We can use the same method to use React Native modules in Flutter. 

For the demo, we use the ToastModule that is also used as an example in the React Native documentation. We lazily create a map of string method names to the actual implementation and invoke it when dart calls the method.
 The only challenge is that most of the native modules refer to other React Native bridge classes, many of which we would have to import or stub out. In this case, we simply had to stub out most of the classes.
Additionally, in production, we would not discover the methods at runtime, but would instead generate the onMethodCall if-else at compile time to call the appropriate React Native methods.

The Universal Modules System


While the above method is not perfect, it does get existing React Native modules to work with Flutter. Ideally, we would not need the reflection and instead just have a "universal" interface that can generate plugins for Flutter, React Native and other hybrid systems.
Service SDKs could simply define something like a Typescript file containing the individual method, their arguments and return types that map to the iOS and Android SDKs and the entire plugin code could be generated. Note that TurboModules will use this code generation approach, with the source of truth for the API being in JavaScript. This method would also eliminate the React Native specific code present in all the dependencies.

As I was working on this, Stanisław Chmiela pointed out the work that Expo has been doing in this area. The video does talk of a "Swagger like" API definition for the interfaces. It works with React Native, with an unreleased implementation for Flutter. Extending it to Cordova or NativeScript should not be very hard either.

Though this is still pretty early, I believe that this idea of a universal module system does hold promise and could help ensure that native modules in all the hybrid frameworks are well maintained, and get the same amount of attention that native iOS or Android SDKs get.
React Native Performance Playbook - Part I

Getting Ready - Setting Up Instrumentation


Over the last six months, I have been working on improving the performance of React Native. I specifically focussed on the startup time in Android brownfield apps and we were able to reduce the time by half. Even as we wait for the new UI architecture (Fabric) and synchronous native modules (TurboModules) to rein in significant performance wins, there are many low hanging fruits that could be leveraged today to improve performance

In this series of blog posts, I wanted to outline some of the work we did and how they could apply to your mobile apps.

Background

When working on performance, it is easier to focus on a well defined scenario, and then apply the lessons in a broader context. Android startup time in React Native apps is a common source of pain and makes for a good candidate for this blog post. To define it more specifically
  • The scenario starts with the onCreate of the application.Though there is a is non-trivial amount of work done from when the user clicks the icon to the onCreate, it is not React Native specific. General Android optimizations will help.
  • The scenario ends when the application loads and the user can interact with it. This metric, also called Time-To-Interaction (TTI), is app specific and needs to be defined in the application code, as explained later. 
Before we jump into optimizing code, we will need to setup instrumentation to understand the application startup time better. This will help us identify the areas that warrant a deeper dive and will validate any code changes that we make later.
We will look at collecting data from production as it better represents the behavior of the app in the real world. We can always augment this with local profiling tools that are available to React Native apps.on local builds.

From React Native

React Native already has markers indicating the various steps during the startup process. By adding listeners to the events from ReactMarker, we can report back all the information that the framework gives us during startup.
  1. Copy the contents of the file PerfLogger.java to your app's <app_root>/android/app/src/main/java/com/nparashuram/PerfLogger.java. This file adds a listener to ReactMarker, and stores the performance events with Thread IDs and time stamps.
  2. In your application's MainApplication.java, look for the onCreate method, and initialize the PerfLogger just after the super.onCreate(); line using this - new PerfLogger(getReactNativeHost()).initialize();


Defining end of TTI

Now that we have started collecting the performance markers, we also need to define when to stop recording. For this blog post, we defined the "end of startup" to be when content is rendered on the screen and the user can interact with it.
This is usually application specific. Some applications would immediately render content while others may have to show a loading screen, perform a network request and then display the response. In either case, you can distill "loading-complete" down to the appearance of a specific React component on the screen.
Add a prop nativeID="tti_complete" to that element. For example, if we are displaying a feed, the last View on the feed could be <View nativeID="tti_complete">.
The PerfLogger java code waits for the native UI element with the nativeID to be drawn, and then makes all performance data available to your JavaScript code.

The JavaScript code

On the JavaScript side, include perf.js in your application code. When PerfLogger.java sees that TTI is complete, it populates a global JS variable with all the data, which can then be sent to a server.
A significant portion of startup also includes the execution of JS code. You could use the ComponentLogger defined in perf.js to mark the start and stop of mounting components. We would typically start with large sections on the UI, and add wrap more components as we want to get more fine grained data. Since this is also pure JS code, you could experiment with various combinations and iterate fast using over the air updates like code push.
 This component simply wraps your component and stores timestamps for them.
The perf.js file also converts this data to a format that can be loaded in chrome://tracing and sends it to a server after a timeout. In the real world, the data should be sent in the same way any other analytics information is sent.

Analyzing the data

Once we start getting data from production, we can start looking at data from individual traces. Note that using averages here may not help since averages of the ranges do not add up. Instead, we could pick a trace that represents a certain percentile. For example, if our goal is to make our app load in under 1 second for the 75th percentile, we could pick the trace representing P75.
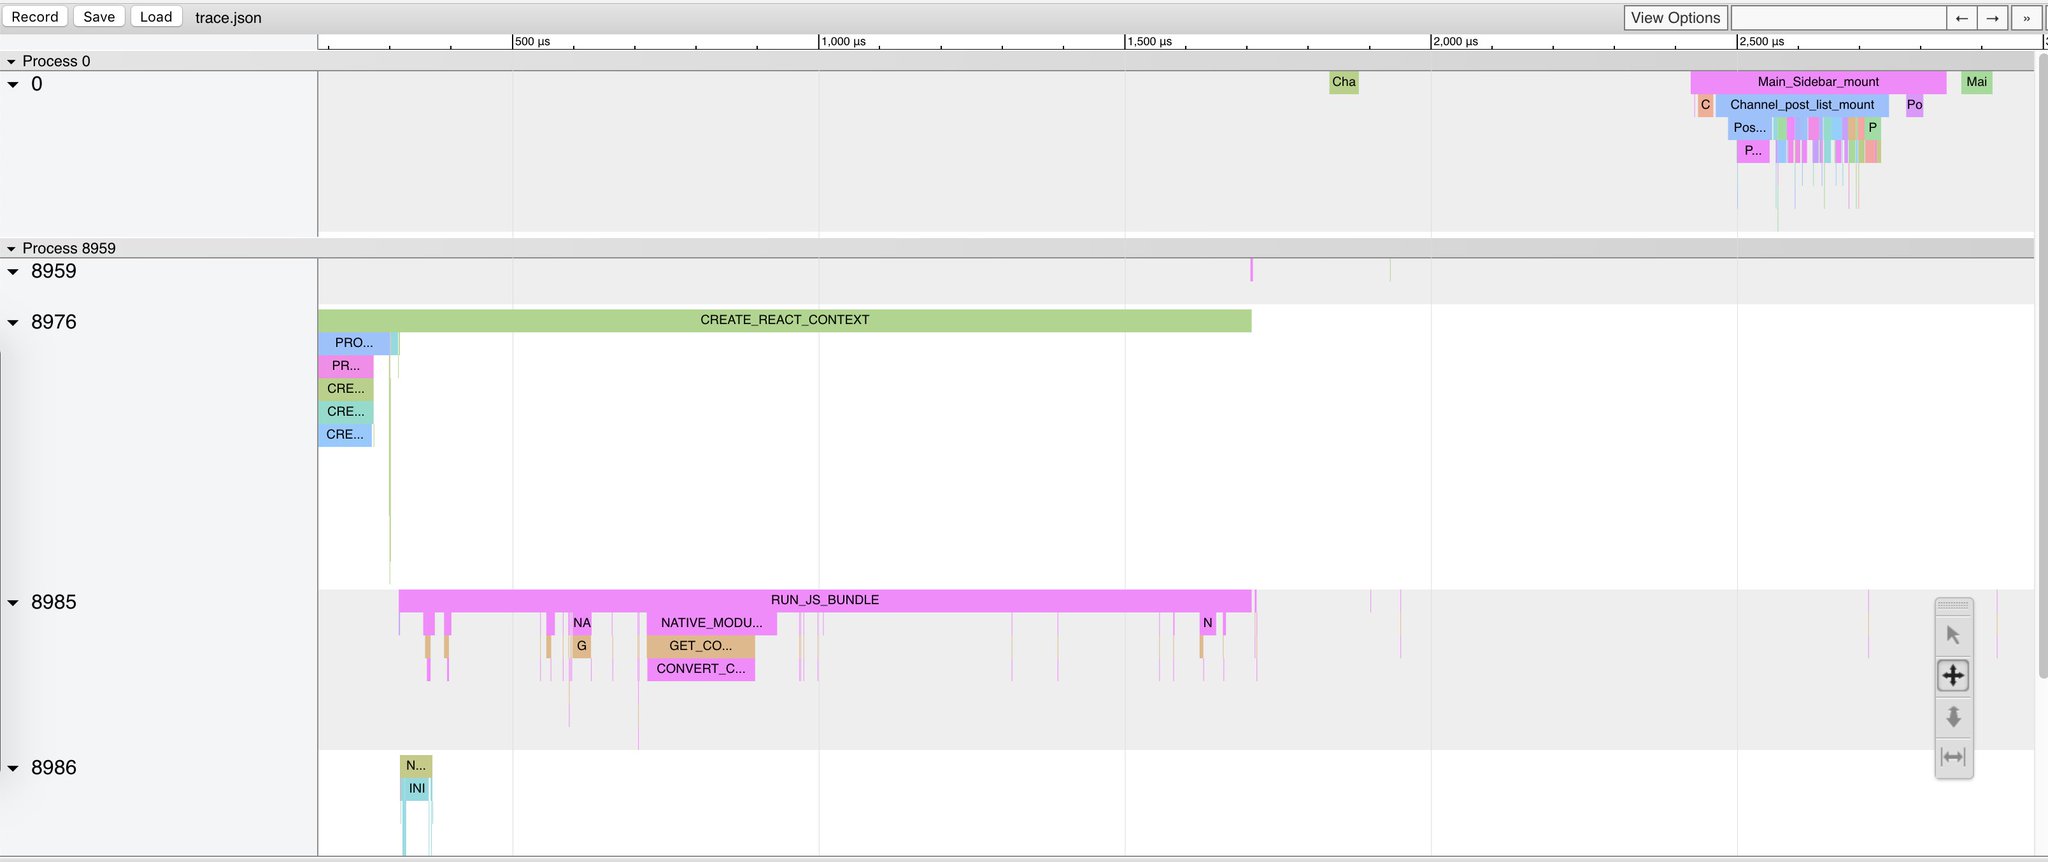
The tracing file can be loaded in chrome://tracing to drill deeper into individual sections. For this post, I looked at the MatterMost app, and here is how a sample trace may look.


Since we also collect thread information, we can see the four threads on which React Native runs. To differentiate React Native code from application logic, I just made that a separate Process 0 at the very top. Note how we record both the loading screen, and the actual content that is rendered, before marking TTI complete.

Next Steps

In the next part of this series, we will look at how we can use this data to start optimizing sections. I would like to base the post on real data, so if you were able to collect this information, Contact me @nparashuram I would love to analyze it and talk about the parts we should optimize.

React Native Road Map

At ReactConf 2018 (October 25-26, 2018) at Henderson, Nevada, I spoke about React Native's new architecture covering the JavaScript interface (JSI), UI re-architecture (called Fabric) and the new native module system (called TurboModules).


I dove into more details and added a little bit of "Star Wars fun" on the same topic at React Next (Nov 4, 2018) at Tel Aviv, Israel.


React Native in an iOS/Android app

As a web developer, the potential to use JavaScript for building iOS and Android apps has always excited me. My first encounter with such a framework was Apache Cordova, an open source project with contributions from individuals and corporations like Google, Microsoft, Adobe, IBM, Intel, etc. I soon became a committer and started building developer tools for it as a part of my previous job.
At my new job, I wanted to continue working on mobile frameworks and joined the React Native team. Before moving full time on React Native Open Source, I took a slight detour and worked on the company's flagship app, parts of which are written in React Native (RN) . This blog post is a brief account of my experiences with using RN in a large scale iOS/Android app.

Brownfield and Green Field Apps

The main app has many years worth of code in it, spanning multiple teams over many thousand commits. The features are built using an array of internal and open sourced frameworks. Moving the entire app to one framework would be a herculean task for an app of this scale. The teams pick the technology for specific features based on technical merit, developer workflow and team skill-set. Thus, RN is used alongside the other frameworks and UI components, APIs and developer tools are also shared widely.
This is what is typically called a “brownfield” app in the community, as opposed to “greenfield” apps that are bootstrapped using RN from scratch. Internally however, this distinction is fluid since all apps are viewed as iOS or Android apps, using preexisting engineering infrastructure to various degrees.

Developer workflow

Most developers using React Native to build features, use Nuclide with its excellent Flow support. Nuclide is also pretty well integrated with technologies across the stack and has support for debugging and inspecting elements. It also proves useful occasionally when using the iOS debugger for native code.
I have also found myself dabbling in IntelliJ and XCode when developing/bridging native components or tracking down bugs that span languages. To produce simple test cases for reproducing bugs, we also have a standalone “kitchen sink” app with all components.
One of the biggest differences between the open source setup and our workflow was the use of BUCK as a build system; primarily proving useful due to its cached artifacts in a big project, reducing the overall build times. Most common tasks like adding new screens, generating tests, etc. are automated.

Native Components and Modules

To the end user, the entire app is one cohesive experience and parts of the app using RN should be no different from the rest of the app. The entire app has well defined user interface guidelines and CSS based styling in RN makes its implementation easy. Bridging native UI components for controls that exist is preferred as it promotes style consistency and is such controls are also well tested. We do not use react-native link, but instead rely on the BUCK files to manage JS and native dependencies separately, adding dependencies directly into the native code.
Flow definitions are used to ensure correctness between the JS API and the Java/ObjC implementations. This is vital for over the air updates as it ensures that JavaScript does not call into API methods that do no exist. Many other companies using React Native also seem to have similar tooling, and it would be awesome to see some of these tools open sourced.

Navigation

Our iOS and Android apps have their own navigation system to push view controllers or start activities using Intents. The RN navigation module plugins into this system and exposes API methods that make switching between RN and native screens seamless.
  • Each “route” declares a unique name and defines parts of the navigation UI like the title bar, action buttons, etc.
  • This information is then used to generate a JSON file at build time.
  • The RN navigation module uses this file to open the correct screen without having to wait for JavaScript to load or show a “redirection” screen.
Though the actual screen is drawn asynchronously, the navigation UI transitions smoothly as all the information can be inferred from the JSON file. This mechanism also helps when loading a screen directly from deep linking or clicking on a push notification.

Loading Screens

As you may have deduced from above, the JavaScript VM may not load until a screen needs it. The navigation also does not wait for React Native screen to be ready before pushing it into the viewport. As a result, there may be a momentary blank screen before JavaScript can kick in to show loading shimmers.
To mitigate this, I experimented with adding a loading screen in native code, possibly generated at build time from RN routes. The two issues that I noticed include
  1. Duplicating A/B testing logic that happens at runtime to ensure that the loading screens have the same appearance as the fully-loaded screens.
  2. Adding more native code during bridge startup also seems to delay RN start. This is only a problem when a network fetch may be faster than the time to start up the bridge.
In most cases, network was slower, and in addition to native loading screens, we found we could pre-load JS modules eagerly and even render parts of the component tree to be ready for the next React reconciliation cycle.
Systrace also comes in very handy when trying to understand the performance semantics of such optimizations.

Data Fetch

Most of the RN data fetches happen over Relay. However, there are also cases where we would need to re-use data that are already fetched by native screens. Having a single data fetch strategy would be ideal but for now, we just have a one-off data pre-fetcher so that the network portion of the critical path could be handled earlier. This native pre-fetcher also lends itself into interesting cases where we could predictively fetch data or even load the RN bridge if we believe that there is a high possibility for the user to request it.

Conclusion

While I have tried to cover some of the areas of RN I touched in the main app, there are many more areas like A/B testing, gesture handling, etc that I could not go over. Overall, I had a good exposure to complex React Native hybrid app development in the last six months. I learnt that it is important to embrace the platform and build for it.

The React Native team has expertise in iOS, Android and JavaScript, and were very helpful in my journey. Coming in as a Web Developer turned Program Manager, I now find myself now working with iOS and Android native code. I realize the importance of continuous learning and stepping outside my comfort zone to learn from other platforms !
I look forward to my next set of projects where I am hoping to help the React Native community.

Reactathon Keynote - Building apps with React Native

Day 2 Keynote - Building apps with React Native 
March 22, 2018 at Reactathon 2018, San Francisco